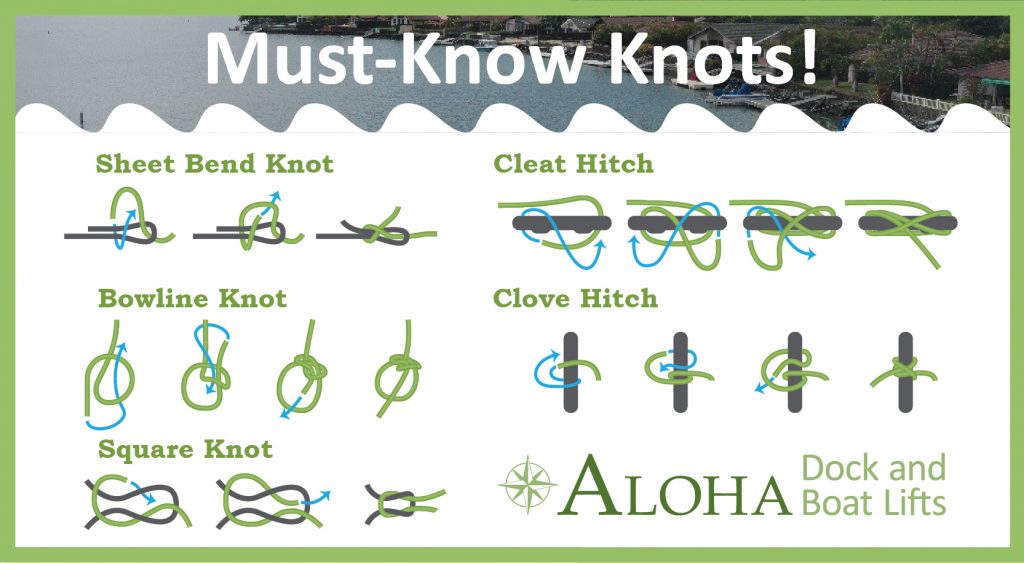
Cleat Hitch
The cleat hitch knot is essential for securing the mooring line. You can easily untie this knot, but it is very strong. The cleat hitch knot is a universal knot, but the general golden rule of thumb is that when there is no cleat available, it is best to use a different knot entirely. However, where there is a cleat available this knot is a simple yet strong knot to secure anything down and keep it from floating away.
Step 1:
Use the rope to take a turn around the cleat. Pull the rope over the middle of the cleat.
Step 2:
Pull the rope under the ear of the cleat and start a figure eight across the top of the opposite ear.
Step 3:
Check to make sure your figure eight is correct before continuing with the rest of the knot tying.
Step 4:
Make an underhand loop and place it over one of the cleat’s ears. This should pin the free end of the rope under the last line wrap.
Step 5:
Pull the free end tightly. This final half hitch is the last step, and your cleat hitch knot is tied.
Clover Hitch
The Clove Hitch knot is an easy knot to tie and loosen and it has many different uses. This not is not the strongest knot and requires constant pressure from both ends of the rope to stay knotted but an important knot for boaters to know.
Step 1:
With the rope, wrap the free end around an object or piling.
Step 2:
Cross the rope over itself, wrapping around the object a second time.
Step 3:
Thread the working end of the rope under itself under the last wrap.
Step 4:
Pull the end tight for a successful Clove Hitch.
Bowline
The Bowline knot is a universal knot that has many different uses from securing sails, mooring a boat, and joining separate ropes together. It is easy to tie and untie if there is not a lot of pressure on the line.
Step 1:
With the rope, wrap the free end around an object.
Step 2:
Cross the rope over itself, wrapping around the object a second time.
Step 3:
Thread the working end of the rope under itself, under the last wrap.
Step 4:
Pull the end tight to execute a Clove Hitch.
Sheet Bend
The Sheet Bend Knot is one of the most important knots boaters can know when joining two ropes together. It is simple to tie, strong, and has a vast amount of uses. The ends of this knot should be left as long as possible when securing heavy objects and can looses when not under a heavy load.
Step 1:
Make a loop with the first rope. Using the second rope, pass the working end through the first rope’s loop.
Step 2:
Wrap the second rope around the loop and tuck the working end under itself.
Step 3:
Hold the standing end of the first rope and pull the working end of the seconds rope to tighten.
Square Knot
The square knot is another great knot for joining ropes together to temporarily tie things down. This know has many practical uses for boaters, but it is not the most secure and trustworthy knot.
Step 1:
Using two lengths of rope, lay them side by side and cross one over the other to form a half knot.
Step 2:
Cross the two ends over a second time.
Step 3:
Pull the ends tightly together.
Step 4:
Tighten the knot as much as necessary to tie a Square Knot.
These knots can be very helpful in a lot of situations and are knots that every boater needs to know. It is important to always double check your knots and practice them before usage!
Sailor Docks and Boat Lifts is not liable or responsible for any accident that could occur from improperly tied knots.